
List Price: Price Unavailable
Sale Price: $12.99
Today's Bonus:

Lets start off with the big question, was this easy to instal? Well, once you watch the You Tube video that they offer it isn't all that bad.
I had my controller in pieces for over an hour on Christmas Morning trying to figure out why the printed circuit board (PCB)wouldn't come out, after watching the video I was done with the rebuild in less time than I spent trying to figure out how to get the PCB out, from removing the first screw to testing the controller took about an hour.
A huge portion of my assembly time was dedicated more to custom work like combining the original PS3 buttons and the buttons that came with the kit until I had the look I wanted, believe me this is the hardest part of the process because you will want to make it look pretty and all clear may not be your thing. Plan on putting the buttons in a few times before you look at it and like it My biggest problem with this kit was that because you could really get fancy I spent a lot of time choosing to get the look I was happy with.
Were there problems? Well besides my does this look better than that floundering I only found one small problem. I needed to attach a couple of small pieces of 1/16" [1.5mm] thick foam to the Dual Shock Motors because they were not held as tight as I would have liked by the provided webbing alone and the foam made a nice fit between the motor and the housing that gave a nice quality feel. A final word of advice would be to keep track of the contact pads that go under the buttons, I had one shift on me making for some assembly problems and a directional button that wouldn't work, it was easily corrected, but I could have done without the problem.
Did I have any complaints? Only one, I wish there were printed instructions for this kit, I know the video is really nice and easy to follow, but I do have a thing for diagrams.
What tools did I need? I used a Precision Philips #0 screw driver to open the case and remove the battery and PCB and a pair of side cutting pliers to cut the old webbing that held the Dual Shock Motors.
Overall, if you are good with tools and think you can do this without getting easily frustrated I say go for it if you want the clear look. This is a controller look that you just can't buy so I have a feeling that you will be able to show this upgrade off with a little pride.
Click Here to Read More Reviews >>
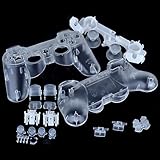
I ordered this case because i had stepped on and broken the case of my original controller and it is crazy expensive to replace the controller with one that has all the features as the 1st party controllers. The shell on a whole is a near perfect reproduction of the sony shell but... the buttons dont have any labels and the control sticks dont quite feel like the same rubber harder and slicker.the buttons that come with this seem like they are a little bit smaller than the original and dont have labels so i used the original buttons and the ps button from my donor controller they fit perfectly and it looks great i decided to use the support that came with the controller and ended up having to break the old support to get the wires free and to keep the motors from moving around i pulled the foam pads from the donor controller as well and put in the new case. In the end i think it worked out fine the hardest part was getting the trigger buttons to work right i had to remove and reassemble the case several times i recommend to anyone undertaking this project to leave the l1 and r1 buttons out and use a small screwdriver to manipulate the l2 and r2 buttons to make sure they work right before pushing the l1 and r1 buttons in as they can be put in after the case is fully assembled. Also if anyone has the springs break a cheap fix is a 3.5" floppy disk pulling the metal shield off will reveal a spring with the same tension as the old springs and the legs are just a bit longer than needed all you do is take a wire snips and cut them down.
Update: My cat dumped the controller in a bucket of water ruined it. But while i was trying to get it to work again i found an issue with the supplied white webbing there is a small raised piece of plastic under the ps button this pushes up on the cellulose contact pad and causes false presses to occur also if you use the original ps button like i did it is a hair too big on one of the tabs and it rubs and sticks when i get around to replacing the pcb of my water destroyed controller ill use a file and fix the slight bit that is off.
Buy PS3 Clear Replacement Controller Shell Now
I loved it. I received everything I needed to replace my old ps3 controller. It even came with the little screw driver, which normally you have to purchase separately.Read Best Reviews of PS3 Clear Replacement Controller Shell Here
This review is for the yellow one, but since everyone is commenting here, I figure I make my review here. It works alright, need to do a bit of clipping here and there, and why no yellow thumbsticks. Doesn't matter since I didn't use the yellow buttons, just the shell. I would order more if it wasn't for one thing, my last 2 PS3 controllers have A1 at the end of the model number, yes I could use the plastic covering, but there is still one spot that your suppose to put the plastic circuit board on. It will be kind of loose, not sure if it will make it a big deal, but I'm skeptical on it.Want PS3 Clear Replacement Controller Shell Discount?
I was skeptical at first so I only bought one. It fit perfectly and looks great. I will be purchasing more for the rest of my controllers.
0 comments:
Post a Comment